Photoshop Clipping Path Services For Photo Retouching
Mar 23, 2021 ·
1m 52s
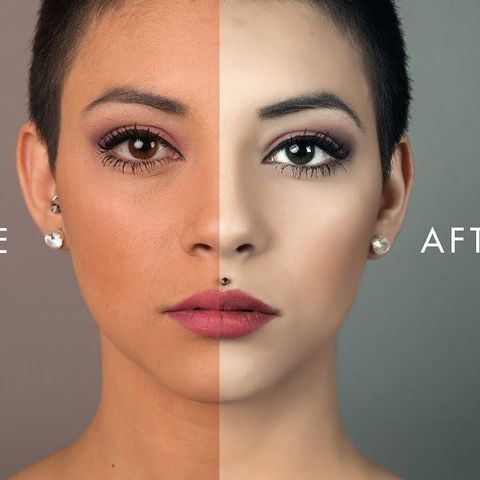
What is retouching hair in Photoshop tutorial? Remove unwanted background hair from Photoshop like stray hairs in Photoshop by using a retouching tool in Photoshop tutorial. This is done by...
show more
What is retouching hair in Photoshop tutorial? Remove unwanted background hair from Photoshop like stray hairs in Photoshop by using a retouching tool in Photoshop tutorial. This is done by selecting an existing layer in Photoshop and then pressing the "shift+click" key. The selected layer will be removed and you can see the "new" layer below it in Photoshop tutorial.
Move the cursor inside the layer's outline to reveal its clipping path. Right click to make it editable. Use the "shift+click" key to set the path. Clipping path allows you to mask high resolution hair so that you can change its color or remove it if you want a different look for your hair.
If you are doing retouching hair in Photoshop tutorial, the first thing you need to do is to open an image editing program like Adobe Photoshop. The program you are using should be free of virus because this tutorial will be dealing with the sensitive information within it. Open the image editing program, then click on the tools in the left panel. Select the Brush Tool, then click on the "Size" drop down menu.
Click on the" Mask" drop down menu and then click on "New". Enter a name for the new mask. Enter a description for your mask, and you are ready to begin masking. Using the Move tool, you will move the cursor over the image and then use the mouse to create the shape of your mask. The Move tool makes it easy to create a smooth mask. You can also use the Sliding selection tool to create areas of the mask where you want the focus of your retouching to differ from the rest of the image.
Using the layer masking tool, you will do the exact same thing, but you will use the alpha channel to change the appearance of your retouching. To use the alpha channel, simply enter the alpha value into the alpha channel text box, then click the "OK" button. Using the Move tool again to create the shape of your mask, make sure that you move the cursor over the image, and then use the mouse to create the alpha channel mask. Finally, using the sliders and the adjusters, you will make changes to your mask, such as altering its color, depth, or even transparency.
While using the layer mask tool with Photoshop, if you need to make changes to colors, there are many tools that make mask changes easier, such as the color tools, the hue tools, and the light/darkness tools. It is easy to make a quick color change in Photoshop with the hue tool. Just choose an existing color or select a new color and then choose "Hue." With the hue tool, you can create precise color changes. If you need to make changes to the levels of light or darkness in your image, then you will find Photoshop tools for these needs as well. These can be useful when you need to retouch an image of a child or pet, for instance, and don't want the entire photo redone.
show less
Move the cursor inside the layer's outline to reveal its clipping path. Right click to make it editable. Use the "shift+click" key to set the path. Clipping path allows you to mask high resolution hair so that you can change its color or remove it if you want a different look for your hair.
If you are doing retouching hair in Photoshop tutorial, the first thing you need to do is to open an image editing program like Adobe Photoshop. The program you are using should be free of virus because this tutorial will be dealing with the sensitive information within it. Open the image editing program, then click on the tools in the left panel. Select the Brush Tool, then click on the "Size" drop down menu.
Click on the" Mask" drop down menu and then click on "New". Enter a name for the new mask. Enter a description for your mask, and you are ready to begin masking. Using the Move tool, you will move the cursor over the image and then use the mouse to create the shape of your mask. The Move tool makes it easy to create a smooth mask. You can also use the Sliding selection tool to create areas of the mask where you want the focus of your retouching to differ from the rest of the image.
Using the layer masking tool, you will do the exact same thing, but you will use the alpha channel to change the appearance of your retouching. To use the alpha channel, simply enter the alpha value into the alpha channel text box, then click the "OK" button. Using the Move tool again to create the shape of your mask, make sure that you move the cursor over the image, and then use the mouse to create the alpha channel mask. Finally, using the sliders and the adjusters, you will make changes to your mask, such as altering its color, depth, or even transparency.
While using the layer mask tool with Photoshop, if you need to make changes to colors, there are many tools that make mask changes easier, such as the color tools, the hue tools, and the light/darkness tools. It is easy to make a quick color change in Photoshop with the hue tool. Just choose an existing color or select a new color and then choose "Hue." With the hue tool, you can create precise color changes. If you need to make changes to the levels of light or darkness in your image, then you will find Photoshop tools for these needs as well. These can be useful when you need to retouch an image of a child or pet, for instance, and don't want the entire photo redone.
Information
| Author | Partia |
| Website | - |
| Tags |
Copyright 2024 - Spreaker Inc. an iHeartMedia Company
